January One -- Tutelage
January 30, 2007
Janice and Marge
*** This is a VERY picture heavy post. Hopefully it's worth it! ***
Yesterday my partner in crime had to work (and when I say work I mean spend all day in a yarn shop knitting. And occasionally selling some yarn.) I was telling her about my blog post, the one where I swore up and down in Latin, and the cell phone connection was sketchy at best. She kept asking me "Who are Janice and Marge?" And I'm all, "I don't know. Who are Janice and Marge?" It was like that old(ish) cell phone commercial where the wife asks the husband to take a shower and comes home to find the kids covered in flour. You know which one I mean? I'm trying to freaking curse in Latin, telling her about Janus and Mars and she's asking about two ladies of a certain age who play Mah Jong twice a week. If you must know, Ann insists on being Janice, which I guess leaves me Marge. (Sometimes we talk about taking our show on the road - you know - like having our own podcast, because honestly we're so fucking funny together. But usually we come to our senses and realize that while in our own minds we're the next Lucy and Ethel, really we're more like Wilma and Betty. Just not that funny to anyone else.)
I'm in that whole Never Say Never Again mode because I'm about to rock your world with a tutorial that amazes even me - and I've done it (PERFECTLY) twice already. I'll be trying one more time before I move onto the REAL DEAL. This shit's like ALCHEMY. Okay - first the props: Thanks to my Janice - always telling me what an ass I am. Stephanie - for letting me know I had options; Margene, who first told me to CUT IT, JUST CUT IT! Then to Jenn, who reminded me that she fixed a cable in the issue of Yarnival I edited. Jenn led me to Vicki in Michigan who actually did CUT IT, JUST CUT IT! Then Margene told me to email Terry, who she thought had also CUT IT, JUST CUT IT! Terry told me to look in the Harmony Guides Knitting Techniques, Volume 1, p. 67 - which I happened to have on my shelf and which told me EXACTLY what to do - even using my cable as the example. Terry also pointed me here - another person who CUT IT, JUST CUT IT! And, of course, to all of you, who definitely have my back. THANK YOU!
Okay. Take a deep breath and prepare to be amazed. Not just from the results, but at how fucking EASY this is. (Click on any and all pictures for a bigger view.)
STEP ONE:
Prepare your instruments. I told G what I did when he got home last night and he told me I was like a surgeon. And it's true - so sterilize your tapestry needle before performing any cutting.
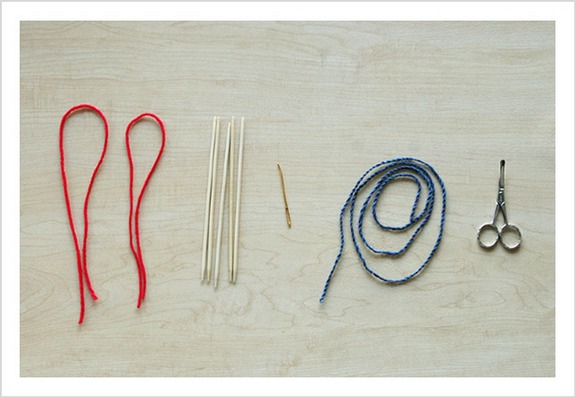
From left to right we've got: two lifelines (any extra yarn you've got lying around - preferably a bit smaller so you can get it in and out easy); double pointed needles (yesterday I went to the craft store to pick up some dpns because I have like 2 sets in all of my needles. I bought 9s, 8s and 5s - I'm using 9s for my project, but thought maybe I should use something smaller. I ended up going with the 5s and it was fine); tapestry needle; project yarn for grafting; SCISSORS. Yes, we're going to CUT IT, JUST CUT IT!
STEP TWO:
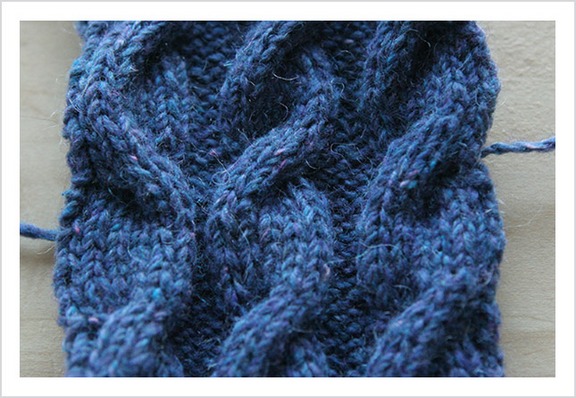
Okay. The first step is to isolate the stitches that need to be fixed. But first, let's show a picture of what the swatch looked like before the fix:
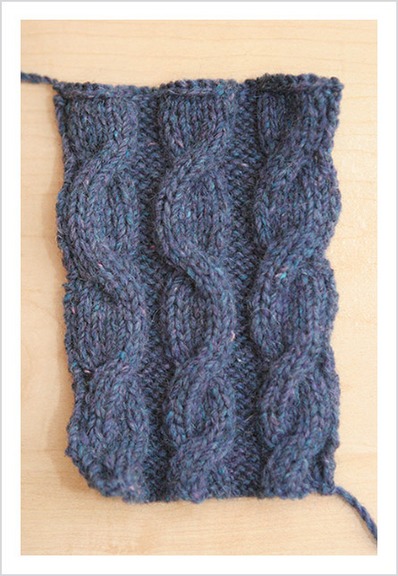
Nothing up my sleeves. ;-) We're going to be working on the middle cable today. This cable is a 6 stitch cable - I've pulled the first three stitches to the FRONT (for a left leaning twist) when I should've pulled them to the BACK (for a right leaning twist.) The thing about cables is that the stitches are almost suspended in the air where they twist. You could conceivably slip your finger through the hole that appears once the twist has been made. For instance:

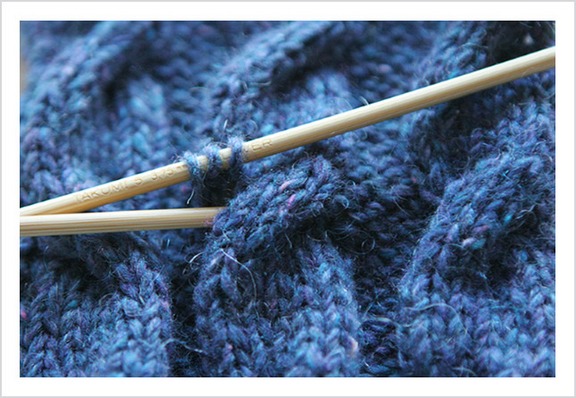
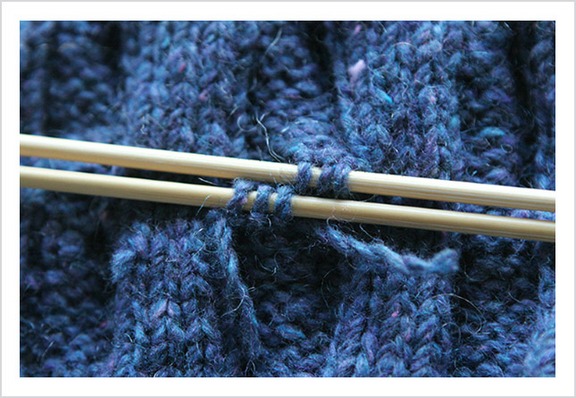
I've slipped the dpn through the hole so that I can isolate the middle row on top of the cable. It's the only row that isn't really attached to any other knitting. There are three stitches there. I'm going to cut the MIDDLE stitch.

STEP THREE:
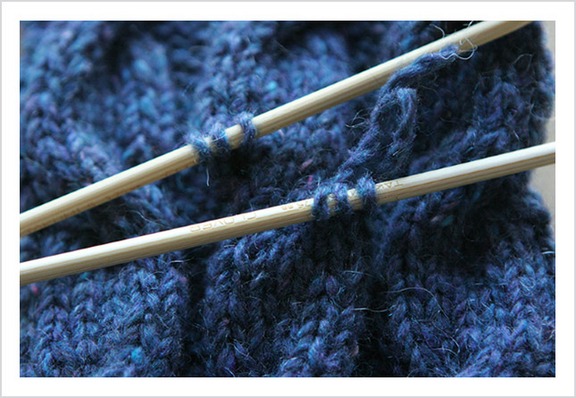
Now that I know which stitch I need to cut, I want to anchor the rows above and below the middle row - these are going to be the stitches I graft together, so I want to make sure they're safe. I do this by threading a life line through both rows.
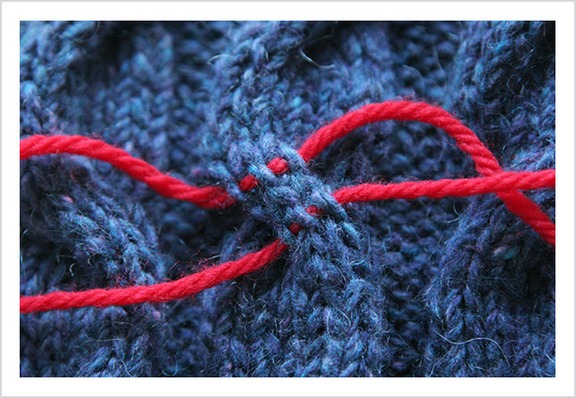
I used a yarn that was smoother and thinner than the yarn I'm using for my project - it's also a contrasting color. Things you might want to consider when choosing your scrap yarn. I also like to use a lot of yarn in these instances - this minimizes the chance that the lifeline will slip out. Great! Now comes the FUN PART!
STEP FOUR:
CUT IT! JUST CUT IT! Yes, my friends, we're going to cut the stitch. Which, I've got to admit, wasn't that hard and was strangely exciting. Like you're doing something really really really wrong but it feels kind of good at the same time. TABOO. Alright. Calm down Janice. Before we cut the yarn, we want to double and triple and quadruple check that we've got the right stitch to cut. WE'RE ONLY CUTTING ONE STITCH! It's the MIDDLE one. Okay? THE MIDDLE ONE.
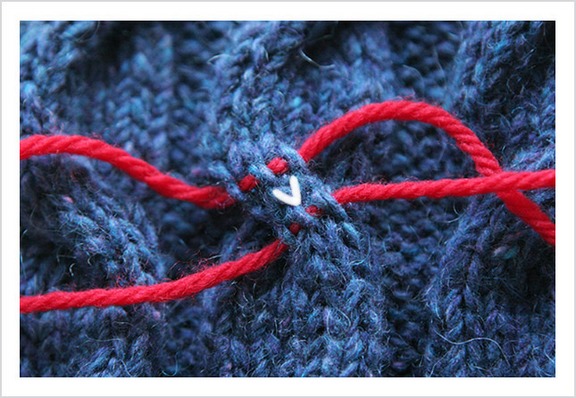
Good! We've identified the middle one. Identified it again. And again. And then lit a candle to Athena. Now we can cut.
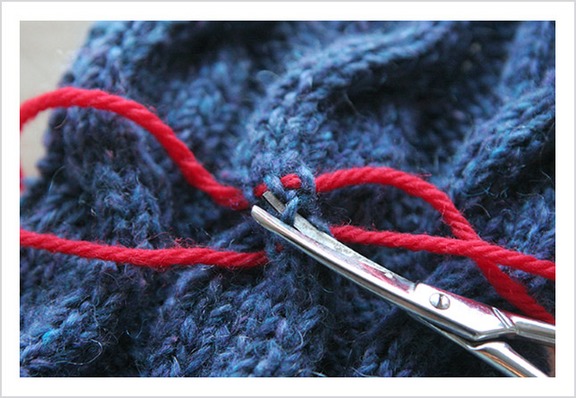
SNIP!
STEP FIVE:
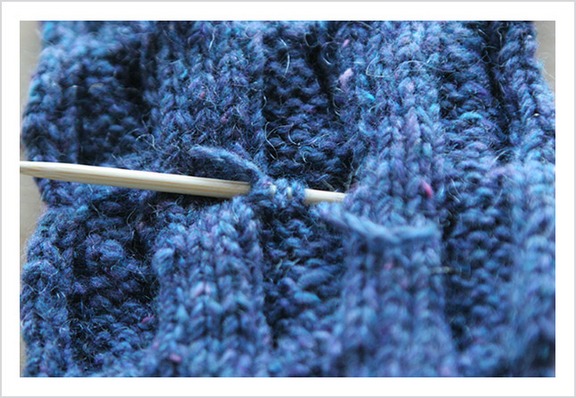
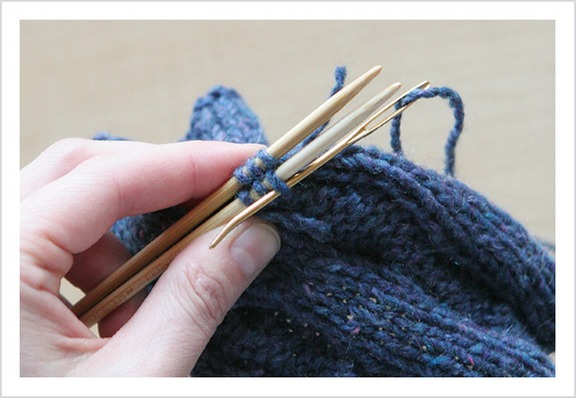
Breathe. Breathe. It's only yarn. We can reknit it. We can make it better than it was before. Knit it stronger. Now you'll need your DPNs. You can pull the cut stitch a little bit, but I prefer to put the newly live stitches on the dpns before I really separate the cut yarn.
Once the stitches are on the dpns, you can take your tapestry needle and unravel the cut yarn. It's all going to open up so nicely. And what you're going to see below the stitches you just unraveled are the stitches that were twisted BEHIND the cable stitches on the top. They look all nice and neat and completely untouched. Just the way we want them to be.
STEP SIX:
Here's where we re-twist the cable. What we're going to do is SLIP the DPN with the stitches on it BEHIND the untouched stitches.
This part is a little bit fiddly because you need to get the DPN completely behind the stitches that will now be on TOP of the cable twist. When you've gotten one DPN all the way through - so that you now have all three stitches UNDER the new cable twist and at the BACK of the swatch (project) - maneuver the second DPN the same way. Now you've got the six live stitches in the BACK.
STEP SEVEN:
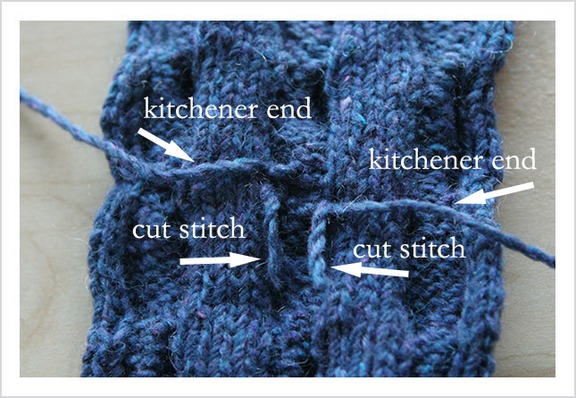
Now we need to somehow attach those live stitches together. I'm going to say the word that people seem to hate: KITCHENER. I actually LOVE to kitchener stitch. Think it's so freaking cool (again with the knitting alchemy) and have it completely memorized. So I kitchenered the live stitches together using a fairly long strand of project yarn.
(Thanks G for the picture!) All I did here was kitchener the six stitches together leaving a pretty long string hanging down. Basically we're putting back the row of stitches we cut out. Here's what the back looks like after kitchenering.

Not bad huh. If you need to learn how to kitchener, there are about a million internet sites to teach you. Here's one I like. Okay, moving on.
STEP EIGHT:
Now you've got four strands hanging out in the back of your work:
All that's left to do is weave in those ends. Chances are your cable butts up against at least a couple of purl stitches on the front - which leaves you knit stitches on the back which are SO easy to weave into. For the shorter strands - the ones from the cut stitch - I like to weave the tapestry needle through the stitches first, then thread in the short yarn and pull it through. I really didn't have any problems weaving everything in. See?
And here's how it looks when you flip it over.
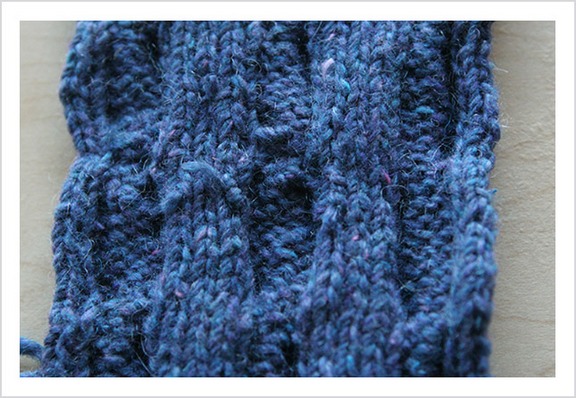
And here's how the swatch looks:
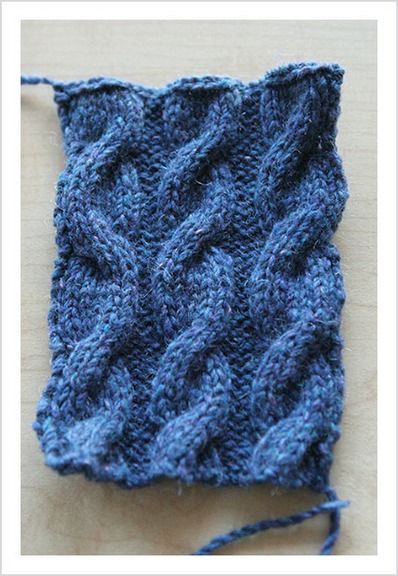
And here's how I look knowing I can fix my sweater and have it look absolutely perfect without having to rip back pretty much the whole thing:

Still scary but much, much happier! Can you believe how easy this is and how fucking fantastic it looks? I've done it exactly twice now and both times it's been so easy and comes out PERFECT. I will be trying it on the one last cable on the swatch - because it's in the same position as the cable on my sweater, but I'm pretty confident it won't be that big of a deal to cut the stitch on my sweater. I HIGHLY recommend making a swatch and practicing first before you attempt this on an actual project. I hope this tutorial helps you. When I called Janice last night to tell her that I had FUCKING DONE IT AND IT'S PERFECT, she said now aren't you glad you made that mistake? Don't you feel all empowered? And yes, I felt incredibly powerful. Which is kind of odd because all I did was snip a little stitch on something that I could easily have knit over again. But I guess it's that I took control and FIXED it. I BOSSED MY KNITTING AROUND. Here's to the power of knitting. And to an amazing community of knitters. Thank you!
PS - There's an excellent chance that someone who comments on this post will hit a BIG number for me. That person will win a prize. It might be this post, it might not be, but it's coming. Have fun!
PPS - THE NUMBER'S BEEN HIT! Loribird left the 18000th comment on the blog! I've been waiting for this for a while now - and it's totally appropriate that it came today because 18=LIFE and I just breathed new life into my knitting. Thanks for reading everyone! I really appreciate it!
Posted by Cara at 10:35 AM | Comments (185)
January 16, 2007
Mistake Rib
No, no - not a fancy new pattern to make a scarf out of - an actual MISTAKE with the ribbing in my Central Park Hoodie. I should just start calling this sweater Mistake Park since I already messed up the swatches. Not a good sign when you're starting out.
I was so happy to show you how I'd done all the ribbing on my hoodie - the one wear I put together the fronts and the back so I could do it all in one piece up to the armholes. I was so happy to be done with the ribbing because I hate ribbing - that back and forth and back and forth. I love to purl - but only when it's in one long stretch. Hate the back and forth.
And I DID finish the ribbing - all 28 rows of it! (Because when you get a swatch to work and you need four inches of ribbing you know EXACTLY how many rows to knit - isn't that cool?) I was all set to start my cable charts when I realized that I had done something very very wrong. Apparently, I can't read a pattern. When I was trying to figure out how to put the whole thing together somehow I neglected to read consult the charts and ended up starting my fronts with knit stitches. As the lovely Margaux confirmed, I needed purl stitches. Yup. I'm an idiot. (And it makes total sense now because I couldn't understand how the pattern wanted you to seam this baby up without giving you any stitches for seam allowance. Turns out it does. Duh.)
So I ripped the freaking thing and started all over. Which I hope is good news for you because I'm going to do a little tutorial about how I cast on for ribbing. Bear with me because I'm not the tutorial type - go see Eunny for that because she ROCKS the tutorial. Or Grumperina. Anybody but me. I get all frustrated and just want to grab the knitting out of your hand and do it myself. So much easier. But Ann asked about my ribbing cast on technique the other day and seemed excited when I said I might write this up and my entire goal in life these days is to excite My Ann.
Okay. This tutorial presupposes that you know how to do a long-tail cast on. Which I shouldn't really suppose because for years I did a knitted cast on for everything and had no idea there were a million other ways to do it. Then I took a class with the knit god Shirley Paden called 101 Ways to Cast On (not really, it was more like fourteen) and she taught me this trick. If you don't know the Long-Tail Cast On, there are like 4,561,923 sites out there to show you. Or you could look here (first cast on mentioned.)
When I cast on for ribbing (2x2, 1x1) or any stitch that alternates knit and purl, I use two variations on the long tail cast on to create a first row of knit purl stitches (or whatever combination I need for my pattern.) For the Central Park Hoodie, I'm using a 2x2 cast on. Those of you familiar with the long tail cast on will recognize this next picture:
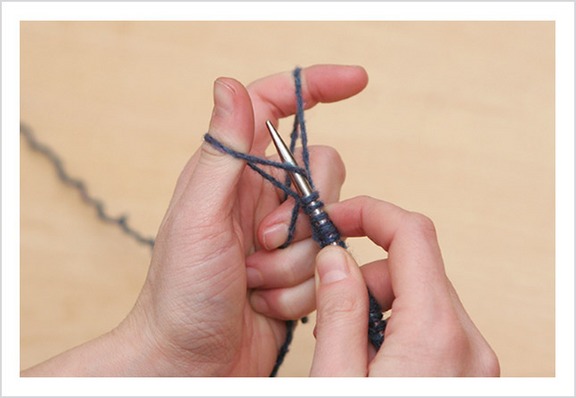
Click for bigger.
This is ostensibly the KNIT STITCH CAST ON. It's also the regular long tail cast on which I use for pretty much everything unless the pattern specifies something else. Or I'm doing ribbing. What happens, though, when you turn the work around to start knitting, is that it can give you a PURL STITCH. This cast on has you sweep under the loop around your thumb first. Again, I refer you to the video in the link above.
Now, there's another way to do this. It has you sweep under the loop around your FOREFINGER. See picture below:
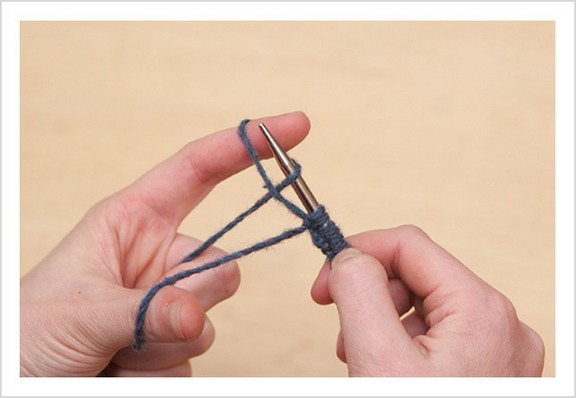
Click for bigger.
This is called a PURL CAST ON which will give you a KNIT STITCH. I don't have pictures to show you how to do this and I tried to explain it to Ann last night, who did get it, I think (we were on the phone) and I couldn't explain to you how to do it if I tried - but here are a few links that might help.
Here's where things might get a bit confusing - although it might just be that I'm confusing - but I have a picture to illustrate.
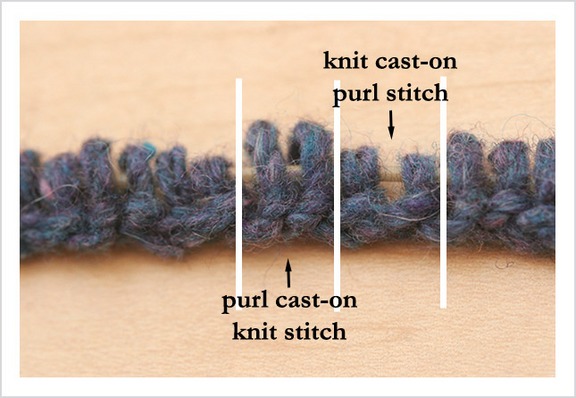
Click for bigger.
When you use the regular long-tail cast on, it gives you a stitch that it is very similar to a knit stitch - so that when you start your knitting, and say, you are doing stockinette stitch, you'd want to begin with a PURL row. This means that your cast on can act as the first row. I, personally, hate having to keep track of things like that and I want to start my first row on the RIGHT SIDE, so when I'm doing ribbing, if the pattern calls for k2 p2, I will cast on PURL WISE PURLWISE KNIT WISE KNIT WISE so that when I turn my knitting around I can just start with my k2 p2 and it will look perfect. See that picture above? (Click on it and it will open in a new window so you can read and look at the same time.) These are stitches JUST CAST ON - they've never been knit. See how the PURL CAST ON/KNIT STITCHES look like they have a purl bump? They do! So when I start knitting on the other side they will be KNIT STITCHES! How cool is that?
Here is a picture of ribbing from a sock I just finished:

Click for bigger.
In this picture, I tried to illustrate how the ribbing will look once it's been knit for a bit - see how there knit stitches start out with a little bump but then flow into Vs? And see how the purl stitches ALWAYS look like purl stitches, from the second you cast on? Isn't that nice? All neat and pretty?
I love to use this for seed stitch borders - the back and forth, knit and purl of the cast on adds a whole new row to the piece.
To reiterate, I cast on my sweater with a p2, k2 cast on so that when I started knitting I could do a k2, p2 rib. I hope this makes some sense to you. As I said, I'm not so good with the tutorials and stuff, but I thought I'd pass along my time tested technique. And a huge thank you to my darling husband who took the pictures of my hands - it must be really really really hard to take pictures for a photographer. I'm sorry I yelled at you. ;-)
Maybe, bar any other mistakes, I'll be able to show you finished ribbing on my CPH. Don't hold your breath though!
Posted by Cara at 10:02 AM | Comments (58)